Tuesday, June 6, 2017
Monday, June 5, 2017
Sunday, June 4, 2017
Wednesday, May 31, 2017
Saturday, May 27, 2017
Wednesday, May 17, 2017
Sunday, May 14, 2017
Saturday, April 29, 2017
Thursday, March 30, 2017
JQuery Sticky Notes integration with Salesforce Tasks
JQuery Sticky Notes integration with Salesforce Tasks
Hi All,
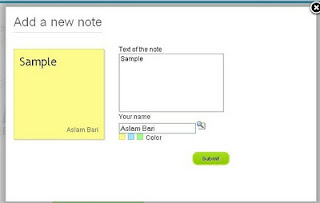
Here i came up again with something interesting stuffs. I found recently one cool JQuery Sticky Notes plugin here Tutorialzine [http://tutorialzine.com/2010/01/sticky-notes-ajax-php-jquery/]. Then i came up with an idea to integration this cool feature with Salesforce Tasks.

Click and View:
Sticky_notes_salesforce
Sticky Dashboard:
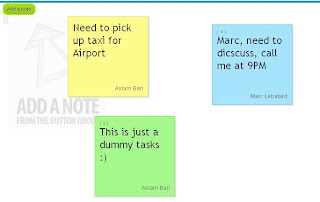
1) Need to push more fields (Status, Priority etc on Add note and dashboard screen for Sticky Tasks Page)
2) Reassign a task to other
3) Also, thinking to integrate this with my previous stuff (VFTalkie), which is voice enabled.
4) Thinking to integrate this with Twilio voice system also, so you no need to write your task, just call and your task will be created on Sticky home :) (Isnt it cool).
5) And many more....
If you need the code just mail me, and As always, provide me your valuable suggestions.
Thanks
Aslam Bari
Available link for download
Saturday, March 25, 2017
Thursday, March 16, 2017
Jquery Image Items Slider Caroufredsel for Blogger
Jquery Image Items Slider Caroufredsel for Blogger

In order to make the image slider items we will use jquery caroufredsel that equipped with next prev mouse navigation and pagination controls for the user, which will make your blog content more beautiful. Implementing of the jquery image slider caroufreadsel for the image items in the content blog, must be use list of the images such as <ul> and <li> tag as the others image slider that I have discussed previously. You have to adjust the distance of the image items that is displayed and the users can scroll per number of image items that is displayed.
1. Create HTML Script Code for Image Items Slider Caroufredsel. Here I’ll take the html script code for the images of my content blog that completed with the lightbox effect, description, etc. Then make the complete HTML Script Code for Image Items Slider Caroufredsel from that. So that the Html Script Code would be like this:
<div id="wrap-carousel"> <div id="carousel"> <ul> <li><a class="lightbox" href="https://blogger.googleusercontent.com/img/b/R29vZ2xl/AVvXsEgUh90gYy0W72P8UU1k5wAbrKXFtkZwdu9khH_xCie1U14TUgHzE4bJjkhu25dZogRd_fJG4GRU6oXXusEF_hc0KV0BFt8plwYGzukKLEH3z3sa28-o_VG-r7IriPjuLIqa4zf7qpfWrnc/s1600/Kalender-Wedding2013-b.jpg" imageanchor="1" style="margin-left: 1em; margin-right: 1em;" title="January"><img border="0" height="200" src="https://blogger.googleusercontent.com/img/b/R29vZ2xl/AVvXsEgUh90gYy0W72P8UU1k5wAbrKXFtkZwdu9khH_xCie1U14TUgHzE4bJjkhu25dZogRd_fJG4GRU6oXXusEF_hc0KV0BFt8plwYGzukKLEH3z3sa28-o_VG-r7IriPjuLIqa4zf7qpfWrnc/s200/Kalender-Wedding2013-b.jpg" width="141" /></a></li> <li><a class="lightbox" href="https://blogger.googleusercontent.com/img/b/R29vZ2xl/AVvXsEjEyCqNj3pWkhIvI5XviZ2V8Gj01wd-nJ-bObeh_9F7vRMULMqBVzuAxpzZ6hkbQvpFCJMVMSkOr2ppnLLa0WaHa4GluxbwfsA5CnqqUUVCst6VxBIqetj7CIdPwJYqTV4D-2RSKHwQo4E/s1600/Kalender-Wedding2013-c.jpg" imageanchor="1" style="margin-left: 1em; margin-right: 1em;" title="February"><img border="0" height="200" src="https://blogger.googleusercontent.com/img/b/R29vZ2xl/AVvXsEjEyCqNj3pWkhIvI5XviZ2V8Gj01wd-nJ-bObeh_9F7vRMULMqBVzuAxpzZ6hkbQvpFCJMVMSkOr2ppnLLa0WaHa4GluxbwfsA5CnqqUUVCst6VxBIqetj7CIdPwJYqTV4D-2RSKHwQo4E/s200/Kalender-Wedding2013-c.jpg" width="141" /></a></li> <li><a class="lightbox" href="https://blogger.googleusercontent.com/img/b/R29vZ2xl/AVvXsEiNTSg8Lk4mYqkhZjs3GgMrCRuev13KD4W8rdOib1eZk40ZeVjZQe_tKhGB63-f3lO0nr5pynmdW75qbGXD_kKubV4LYid4WeLAWJIcJwPFe-xBMqPhy1ZYpyPtSz-XrtaGooTZbUJoLx8/s1600/Kalender-Wedding2013-d.jpg" imageanchor="1" style="margin-left: 1em; margin-right: 1em;" title="March"><img border="0" height="200" src="https://blogger.googleusercontent.com/img/b/R29vZ2xl/AVvXsEiNTSg8Lk4mYqkhZjs3GgMrCRuev13KD4W8rdOib1eZk40ZeVjZQe_tKhGB63-f3lO0nr5pynmdW75qbGXD_kKubV4LYid4WeLAWJIcJwPFe-xBMqPhy1ZYpyPtSz-XrtaGooTZbUJoLx8/s200/Kalender-Wedding2013-d.jpg" width="141" /></a></li> <li><a class="lightbox" href="https://blogger.googleusercontent.com/img/b/R29vZ2xl/AVvXsEjBmGCjE36EGE5CYmCqOYyEw41r1xRQ40r4L38PmMBtXcJa1pMlPL4G_XWAzHOGs8YZ0Bm8D318Ts_1nDe48gHZXBTFBMKB54Ix8JZ7tAWSUzAFkmBp-8iKSFap96fMSkDPM-9Piizum3I/s1600/Kalender-Wedding2013-e.jpg" imageanchor="1" style="margin-left: 1em; margin-right: 1em;" title="April"><img border="0" height="200" src="https://blogger.googleusercontent.com/img/b/R29vZ2xl/AVvXsEjBmGCjE36EGE5CYmCqOYyEw41r1xRQ40r4L38PmMBtXcJa1pMlPL4G_XWAzHOGs8YZ0Bm8D318Ts_1nDe48gHZXBTFBMKB54Ix8JZ7tAWSUzAFkmBp-8iKSFap96fMSkDPM-9Piizum3I/s200/Kalender-Wedding2013-e.jpg" width="141" /></a></li> <li><a class="lightbox" href="https://blogger.googleusercontent.com/img/b/R29vZ2xl/AVvXsEiuVe3vk2rwBKFAZh5hVe1EifDAm_ugJNf0483mj9aDkIebwJdIVbwB0JYX6gkwt6jOl5A1lBdMopie5b19BgzqRtsNqZFPUFLF99o5vMpZCpO0vo88a83mxxMT5_Rq62BTtUs-V1n2N_0/s1600/Kalender-Wedding2013-f.jpg" imageanchor="1" style="margin-left: 1em; margin-right: 1em;" title="May"><img border="0" height="200" src="https://blogger.googleusercontent.com/img/b/R29vZ2xl/AVvXsEiuVe3vk2rwBKFAZh5hVe1EifDAm_ugJNf0483mj9aDkIebwJdIVbwB0JYX6gkwt6jOl5A1lBdMopie5b19BgzqRtsNqZFPUFLF99o5vMpZCpO0vo88a83mxxMT5_Rq62BTtUs-V1n2N_0/s200/Kalender-Wedding2013-f.jpg" width="141" /></a></li> <li><a class="lightbox" href="https://blogger.googleusercontent.com/img/b/R29vZ2xl/AVvXsEgUwrDifTepGsRX1_5JXF8PTZXtPyCEsTqVUyukXGmQqUV_hOA5zl8JsnTMYhA9peKaV1rzfbLeJMBGS2fhJF5Qqm2UnTsHCSHyLwO7UVUQMWSEBxCZgNvotjie4mf_uxdbfJw4PtOrTeU/s1600/Kalender-Wedding2013-g.jpg" imageanchor="1" style="margin-left: 1em; margin-right: 1em;" title="June"><img border="0" height="200" src="https://blogger.googleusercontent.com/img/b/R29vZ2xl/AVvXsEgUwrDifTepGsRX1_5JXF8PTZXtPyCEsTqVUyukXGmQqUV_hOA5zl8JsnTMYhA9peKaV1rzfbLeJMBGS2fhJF5Qqm2UnTsHCSHyLwO7UVUQMWSEBxCZgNvotjie4mf_uxdbfJw4PtOrTeU/s200/Kalender-Wedding2013-g.jpg" width="141" /></a></li> <li><a class="lightbox" href="https://blogger.googleusercontent.com/img/b/R29vZ2xl/AVvXsEhaNyQe22eBakzrMFji-pySRJHIY5SwLOv6kV-H4EgoanTvOon00r0GONMKh3LuZaH-dtEHqJX18x-Be51_9CoKmP3PIlBrDCvzQatlDd2rMuuSowGXyZUNAFVeE-LcGJtMeuCLhsIyNYU/s1600/Kalender-Wedding2013-h.jpg" imageanchor="1" style="margin-left: 1em; margin-right: 1em;" title="July"><img border="0" height="200" src="https://blogger.googleusercontent.com/img/b/R29vZ2xl/AVvXsEhaNyQe22eBakzrMFji-pySRJHIY5SwLOv6kV-H4EgoanTvOon00r0GONMKh3LuZaH-dtEHqJX18x-Be51_9CoKmP3PIlBrDCvzQatlDd2rMuuSowGXyZUNAFVeE-LcGJtMeuCLhsIyNYU/s200/Kalender-Wedding2013-h.jpg" width="141" /></a></li> <li><a class="lightbox" href="https://blogger.googleusercontent.com/img/b/R29vZ2xl/AVvXsEhYM0ltLujUgOUl4uTkFfpeipCyPN7dcUrEdk6l-80je1bL5fHOwLPqbxbQAp5ot9P_f9YV77ozg8skBORnEYD53uuTlURkVvxczrt6loWtMseXloomjTKhfYryIZ1ChvKa_wdN_iA1RCw/s1600/Kalender-Wedding2013-i.jpg" imageanchor="1" style="margin-left: 1em; margin-right: 1em;" title="August"><img border="0" height="200" src="https://blogger.googleusercontent.com/img/b/R29vZ2xl/AVvXsEhYM0ltLujUgOUl4uTkFfpeipCyPN7dcUrEdk6l-80je1bL5fHOwLPqbxbQAp5ot9P_f9YV77ozg8skBORnEYD53uuTlURkVvxczrt6loWtMseXloomjTKhfYryIZ1ChvKa_wdN_iA1RCw/s200/Kalender-Wedding2013-i.jpg" width="141" /></a></li> <li><a class="lightbox" href="https://blogger.googleusercontent.com/img/b/R29vZ2xl/AVvXsEgiAy6b3NU7fWuQvyNEvvshpqnYAUIZUpvjoKCJTh5WwEaJhz9eJuRsZGJwi9GupBolDgXE-ezWhUkxRta8Dgjl9TX1heQ8zdiJgUkq-D7ZysLzRDg2qrpmEF0zpTkpLB9aOklBi7lznTg/s1600/Kalender-Wedding2013-j.jpg" imageanchor="1" style="margin-left: 1em; margin-right: 1em;" title="September"><img border="0" height="200" src="https://blogger.googleusercontent.com/img/b/R29vZ2xl/AVvXsEgiAy6b3NU7fWuQvyNEvvshpqnYAUIZUpvjoKCJTh5WwEaJhz9eJuRsZGJwi9GupBolDgXE-ezWhUkxRta8Dgjl9TX1heQ8zdiJgUkq-D7ZysLzRDg2qrpmEF0zpTkpLB9aOklBi7lznTg/s200/Kalender-Wedding2013-j.jpg" width="141" /></a></li> <li><a class="lightbox" href="https://blogger.googleusercontent.com/img/b/R29vZ2xl/AVvXsEjiHI8I6ndlQlqvmZZF5Sm-KPFRtqelbU-VlJlrSKg8Wj-Vwf_QcL-t4OHeAnYDY27osO_lAn7UNbAQTVQS79AhYK4tv-4IPj_CLWa66DRBH3fdT8fvoHhKc7LO8ryJkBjtFueEdf60aEs/s1600/Kalender-Wedding2013-k.jpg" imageanchor="1" style="margin-left: 1em; margin-right: 1em;" title="October"><img border="0" height="200" src="https://blogger.googleusercontent.com/img/b/R29vZ2xl/AVvXsEjiHI8I6ndlQlqvmZZF5Sm-KPFRtqelbU-VlJlrSKg8Wj-Vwf_QcL-t4OHeAnYDY27osO_lAn7UNbAQTVQS79AhYK4tv-4IPj_CLWa66DRBH3fdT8fvoHhKc7LO8ryJkBjtFueEdf60aEs/s200/Kalender-Wedding2013-k.jpg" width="141" /></a></li> <li><a class="lightbox" href="https://blogger.googleusercontent.com/img/b/R29vZ2xl/AVvXsEgPFDO1dcjiEH7vbYwOJEmiA-m23cRu56AsW-3yhE2TRJVwYgXJYPYnBCvIgrcR-c0me5eyckdQc0f4IA7Ig7SlvmLBYFTZSekzLaPF3tlwF60uVqnndht3psLwwYFs1V63gIkihSx3ytA/s1600/Kalender-Wedding2013-l.jpg" imageanchor="1" style="margin-left: 1em; margin-right: 1em;" title="November"><img border="0" height="200" src="https://blogger.googleusercontent.com/img/b/R29vZ2xl/AVvXsEgPFDO1dcjiEH7vbYwOJEmiA-m23cRu56AsW-3yhE2TRJVwYgXJYPYnBCvIgrcR-c0me5eyckdQc0f4IA7Ig7SlvmLBYFTZSekzLaPF3tlwF60uVqnndht3psLwwYFs1V63gIkihSx3ytA/s200/Kalender-Wedding2013-l.jpg" width="141" /></a></li> <li><a class="lightbox" href="https://blogger.googleusercontent.com/img/b/R29vZ2xl/AVvXsEjiHYp-VYB8q5gLcaHIInfcY4dC1QUf9R7n0yyQ_zgbmZPAf3HZb_kdLV4Lo1bHW6yX2x7XPKnl4kh26zzFh7ncRjf49qUxfIG9Um6q8VOW26JKIBAcx2DOt2RdxJGENtnQf9VMmHczVMs/s1600/Kalender-Wedding2013-m.jpg" imageanchor="1" style="margin-left: 1em; margin-right: 1em;" title="Desember"><img border="0" height="200" src="https://blogger.googleusercontent.com/img/b/R29vZ2xl/AVvXsEjiHYp-VYB8q5gLcaHIInfcY4dC1QUf9R7n0yyQ_zgbmZPAf3HZb_kdLV4Lo1bHW6yX2x7XPKnl4kh26zzFh7ncRjf49qUxfIG9Um6q8VOW26JKIBAcx2DOt2RdxJGENtnQf9VMmHczVMs/s200/Kalender-Wedding2013-m.jpg" width="141" /></a></li> </ul> <div class="clearfix"></div> <a class="prev" href="#"><</a> <a class="next" href="#">></a> <div class="pager" id="pager"></div> </div> </div>
- id="carousel" This will be the css id that will be given the effect of caroufredsel image slider
- class="prev", class="next", class="pager", id="pager" will associated with id="carousel" for the navigation dan pagination of the image slider.
2. Create the Javascript Code using jquery Caroufredsel and initialize class and id css that used on the html script code above. Make sure the template already use jquery.min.js as library master of all jquery! the Javascript Code would be like this:
<script src=https://agratitudesign-template.googlecode.com/svn/branches/carouFredSel/jquery.carouFredSel-6.2.1-packed.js type=text/javascript/> <script> //<![CDATA[ $(function() { $(#carousel ul).carouFredSel({ prev: { button : "#carousel .prev", key : "left" }, next: { button : "#carousel .next", key : "right" }, pagination: "#carousel .pager", scroll: 1000 }); }); //]]> </script> Just Put the above Javascript code to the last head of the blog template !
3. Create the CSS Style Script for Image Items Slider Caroufredsel. The adjustment of the CSS Style Script is absolutely necessary because it is depending on the character of the blog template, the content size of your blog, and the pixel size of the image items. look at the first demo below!


The pixel size of the thumbnail image items has made ??in the portrait orientation with height=200px and width=141px. This jquery image Slider Items Caroufredsel has made on the blog template by Artisteer, CSS Style script is like this:
#wrap-carousel { border: 1px solid #c7d8ad; width: 605px !important; text-align: center; } #carousel { text-align: center; width: 605px; height: 275px; background-color: #e5f2d6; overflow: hidden; position: relative; } #carousel ul { display: block; margin: 0 0 0 25px; padding: 0; position: absolute; } #carousel li { text-align: center; display: block; width: 165px; height: 250px; margin: 0; float: left; } #carousel li img { border: 1px solid rgb(204, 204, 204); background-color: white; box-shadow: none !important; padding: 6px ; display: block; float: left; margin: 0; position: absolute; } #carousel li:before { content: none !important;} .clearfix { float: none; clear: both; } #carousel .prev, #carousel .next { background: transparent url(https://agratitudesign-template.googlecode.com/svn/branches/carousel_control2.png) no-repeat 0 0; text-indent: -999px; display: block; overflow: hidden; width: 15px; height: 21px; margin-left: 5px; position: absolute; top: 115px; } #carousel .prev { background-position: 0 0; left: 0px; } #carousel .prev:hover { left: 0px; } #carousel .next { background-position: -18px 0; right: 2px; } #carousel .next:hover { right: 2px; } #carousel .pager { text-align: center; top: 230px; position: relative; } #carousel .pager a { background: transparent url(https://agratitudesign-template.googlecode.com/svn/branches/carousel_control2.png) no-repeat -2px -32px; text-decoration: none; text-indent: -999px; display: inline-block; overflow: hidden; width: 8px; height: 8px; margin: 0 5px 0 0; } #carousel .pager a.selected { background: transparent url(https://agratitudesign-template.googlecode.com/svn/branches/carousel_control2.png) no-repeat -12px -32px; text-decoration: underline; } Put the above CSS Style script as the additional css to the last of the skin of your blog template !
The blog content of the template blog by Artisteer, the CSS Style on the content much inherits predefined, if you compared to the standard template blog by blog. For example, to disappear from the image list bullet style, should be done this way!
#carousel li:before {
content: none !important;}


The size of the thumbnail image items in landscape orientation was made ??with height=133px and width=150. The Jquery Image Slider Items Caroufredsel was created still on template blog by Artisteer. The width, height, padding, margin of the position of the image item must be adjusted. CSS Style Script as follows:
#wrap-carousel { border: 1px solid #c7d8ad; width: 605px !important; text-align: center; } #carousel { text-align: center; width: 605px; height: 186px; background-color: #e5f2d6; overflow: hidden; position: relative; } #carousel ul { display: block; margin: 0 0 0 20px; padding: 0; position: absolute; } #carousel li { text-align: center; display: block; width: 165px; height: 186px; margin: 0; float: left; } #carousel li img { border: 1px solid rgb(204, 204, 204); background-color: white; box-shadow: none !important; padding: 6px ; display: block; float: left; margin: 0; position: absolute; } #carousel li:before { content: none !important; } .clearfix { float: none; clear: both; } #carousel .prev, #carousel .next { background: transparent url(https://agratitudesign-template.googlecode.com/svn/branches/carousel_control2.png) no-repeat 0 0; text-indent: -999px; display: block; overflow: hidden; width: 15px; height: 21px; margin-left: 5px; position: absolute; top: 70px; } #carousel .prev { background-position: 0 0; left: 0px; } #carousel .prev:hover { left: 0px; } #carousel .next { background-position: -18px 0; right: 2px; } #carousel .next:hover { right: 2px; } #carousel .pager { text-align: center; top: 140px; position: relative; } #carousel .pager a { background: transparent url(https://agratitudesign-template.googlecode.com/svn/branches/carousel_control2.png) no-repeat -2px -32px; text-decoration: none; text-indent: -999px; display: inline-block; overflow: hidden; width: 8px; height: 8px; margin: 0 5px 0 0; } #carousel .pager a.selected { background: transparent url(https://agratitudesign-template.googlecode.com/svn/branches/carousel_control2.png) no-repeat -12px -32px; text-decoration: underline; } As a comparison, for another example is implementation to the blog content, that the template by standard blogger, with the portrait orientation for image items slider as demo 1 on the standard blogger). Lets see the picture below!

CSS Style Script as follows:
#wrap-carousel { width: 570px !important; } #carousel { width: 570px; height: 275px; background-color: #e5f2d6; overflow: hidden; position: relative; } #carousel ul { list-style: none; display: block; margin: 0 17px; padding: 0 10px; position: absolute; } #carousel li { text-align: center; display: block; width: 165px; height: 250px; margin: 5px; float: left; } #carousel li img { border: 1px solid rgb(204, 204, 204); background-color: white; box-shadow: none !important; padding: 6px ; display: block; float: left; margin: 0; position: absolute; } .clearfix { float: none; clear: both; } #carousel .prev, #carousel .next { background: transparent url(https://agratitudesign-template.googlecode.com/svn/branches/carousel_control2.png) no-repeat 0 0; text-indent: -999px; display: block; overflow: hidden; width: 15px; height: 21px; margin-left: 5px; position: absolute; top: 120px; } #carousel .prev { background-position: 0 0; left: 0px; } #carousel .prev:hover { left: 0px; } #carousel .next { background-position: -18px 0; right: 2px; } #carousel .next:hover { right: 2px; } #carousel .pager { text-align: center; top: 230px; position: relative; } #carousel .pager a { background: transparent url(https://agratitudesign-template.googlecode.com/svn/branches/carousel_control2.png) no-repeat -2px -32px; text-decoration: none; text-indent: -999px; display: inline-block; overflow: hidden; width: 8px; height: 8px; margin: 0 5px 0 0; } #carousel .pager a.selected { background: transparent url(https://agratitudesign-template.googlecode.com/svn/branches/carousel_control2.png) no-repeat -12px -32px; text-decoration: underline; } Has noted here is how to remove the bullet style of the images list by inserting list-style: none; to the css id #carousel ul without requiring additional css id #carousel li: before (only for Artisteer template)
If you are still confused how to insert HTML, Javascript, and CSS scripts for the jquery Image Slider Items Caroufredsel, Lets see the article video above!
Available link for download
Tuesday, March 7, 2017
Sunday, March 5, 2017
Sunday, February 12, 2017
Tuesday, January 31, 2017
jQuery getScript FireBug And Caching
jQuery getScript FireBug And Caching
Recently in one of my projects I had a requirement of loading JavaScript files dynamically. It was then I took a look at the jQuery getScript method. At first it looked perfect for my requirement, however as I started using it for my project I realized there were two drawbacks with its default implementation.
- There isnt any caching for the scripts loaded by getScript
- Debugging these scripts in FireBug is quite difficult since FireBug cannot map the script code to the script filename
In this post, I am going emphasize on my experiences with getScript and how I got both it to work with both these requirements. I am sure people who are spending time to get these features working will find this useful.
To help me with this, I put up an example Visual Studio project available here. I used Visual Studio for comfort but any text editor will work since it is all about HTML and JavaScript.
Basic Example
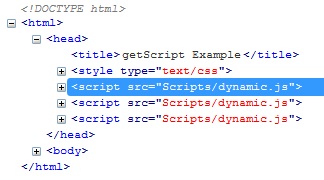
Well, getScript is pretty easy to use. In its simplest form, all we have to do is provide it with the script name. Heres an example on how it looks.

But the interesting point is the way it works. Heres a screenshot in FireBug which show three calls being made to the server since getScript appends a random number to the server call causing the browser cache to fail. And the script debugger is also unable to recognize the script name.
![]()

Enabling Caching
Solving the caching issue was simple. Following the recommendation on the jQuery getScript documentation page, I setup AJAX caching using ajaxSetup as show below.

This worked well but the only problem that I noticed was that ajaxSetup was a global option and setting it there would make all AJAX calls cached which could mean trouble for the regular data calls we make. Fortunately the documentation page also had a solution for this. I wrote a new jQuery method using that solution as shown below.

Making getScript FireBug Compatible
At first I had had no clue on why this was happening. But thanks to the guys at TechMonks who wrote an absolutely brilliant article on this problem, I could get this fixed. In short the problem was because of how jQuery implements getScript wherein it uses AJAX to the script content and makes it inline. Do read the entire article here for more details.
Here is a code snippet which make getScript compatible with FireBug. The reason why this works is because it loads the JavaScripts files as external resources instead of making it inline and FireBug shows them in the debugging panel.


Internal Caching
The new firebugGetScript from TechMonks works great with FireBug and also facilitates browser caching. However I had one more issue with it. My web application was completely dynamic and had to load a lot of scripts on the fly. Because of this there were scenarios where I was calling the same script through firebugGetScript. However the method wasnt smart enough to recognize this and added the script element multiple times.
I added the ability to recognize this and changed the code to the following.

And things looked perfect with this. I have been using this for quite some time in two different web applications and its working as expected.
Thats it for this post, hope the next time isnt as far away as this ;)
Available link for download