Showing posts with label joomla. Show all posts
Showing posts with label joomla. Show all posts
Thursday, April 27, 2017
Joomla Template Installation
Joomla Template Installation

There are many ways to Build a website, one of them using Joomla CMS. Here I will explain to you about the process of installing Joomla 2.5 on the local server, in your personal computer. CMS (Content Mangement System) Joomla is very powerful CMS websites supported with the great security system, easy in operation.
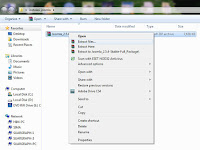
Installing Joomla website on the local server, we must to install Webserver system such as Wamp Server. After WebServer installed correctly, then we can begin the installation process for our joomla site. In this case we are using Joomla version 2.5, you can download the latest version here. Extract the Zip file that you have download then rename as you want. Look at the picture below!
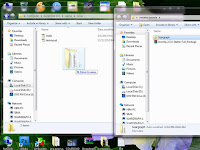
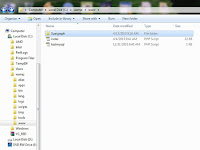
The Folder that you renamed, copy into your web server directory. If you are using Wampserver, copy the folder to the www directory (C: wamp www). Make sure Wampserver already in active with the indication icon is green colour. Then type the name of the folder that you copied to your web browser "localhost/suargraph/", the browser is ready to run Joomla installation process. Look at the picture below!
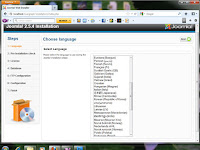
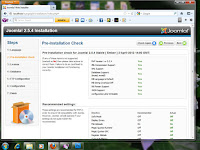
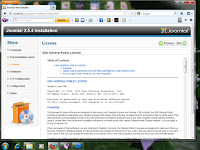
Step 1 Languange, choose your default language is used. Step 2 joomla checks your web server system, green means its in accordance with the recommended system Joomla. In setting conditions that are not recommended even joomla can still run. Click next!
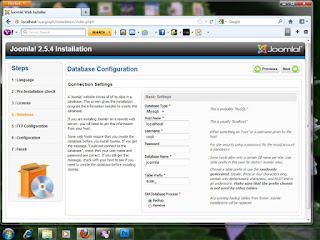
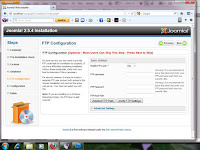
We get to the configuration database that need to be filled. On the default setting, fill username as root, password as blank. Then the database name and table prefix you are specify by yourself. Then click the Next button! Step 5, FTP configuration that we can skipped it, and the click Next button. The next step is to fill its Main Configuration. Sitename is name of the website that you want, then fill your email address, admin username and admin password you set yourself. Username and password will be used when we want to access the joomla admin to manage the content and the overall look of your website. Click next we will arrive at the last step to remove the folder installation. Click Remove and then click Next button, the installation process has been completed. Look at the picture below!
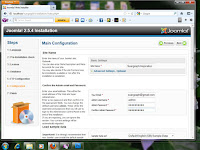
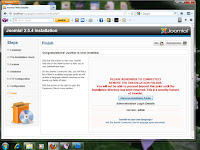
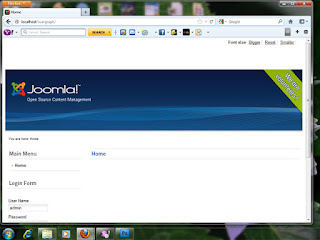
Then we will check the frontend of your website, Click Site button will appear as shown below!
To make major changes of content, and template or system your site, we have to go to system administrators as appearance below!
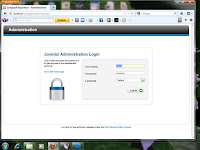
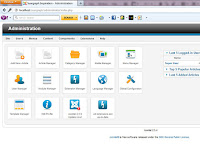
So the joomla installation is finished and you get ready to a manage content and system in joomla site. For more clearly lets see the video tutorial on this article!
Available link for download

Saturday, February 18, 2017
Joomla Image Lightbox Evolution All Images
Joomla Image Lightbox Evolution All Images

After successfully implementing the image lightbox evolution into the blog content, then I have though how to apply it to the joomla website. As you probably know a lot of extensions that provide convenience to you in making the image lightbox effect, but I think none more impressive than the lightbox evolution. Therefore, it is dedicated to you who use joomla to build your website as your choice, I will describe the implementation of image lightbox evolution to the joomla website automatically to all images of the joomla content.
Here I use the analogy of a blog in the applying the image lightbox evolution. This method is not going through the database but directly to the joomla templates system that has been used. For those of you who want to have the impressive image lightbox effects, I will explain all to you as the results of my experiment in implementing image lightbox evolution into a Joomla website.
Suppose you have a lot of images in the content of your joomla website, and you want to make lightbox evolution effect to all images that lies to the content of your joomla. What I have pointed out before is inserting class=lightbox on each image tag. But right now we do it in a different way with a lightbox evolution effect that is very elegant if you apply it to your joomla website. Ok! Lets get started!
The things that you only need to do is inserting the scripts lightbox evolution into the index.php of the template that you use now. You can find the file of index.php of the template directly to the source of directory of your joomla website, or you can go through your joomla backend (administrator panel). You simply type on your browser : http://yourwebsite.com/administrator. If your joomla still in local server of your computer, just type : localhost/websitename/administrator. Lets see the picture below!


On the main menu of your joomla backend, select Extensions>Template Manager. Then you will find the Template Manager: Styles. In the column template please select the template that you are using in active now as I marked in red on the picture below!

You will be in customize template, and then you click on the Edit main page template, as I marked in red as shown like the left picture below! and next you will find index.php template as the purpose of this step, the place where we will insert the scripts code to make lightbox evolution to all images to the joomla content. Please have a look at first the script from the index.php of template, as the right picture below!


1. Inserting jquery.min.js to the index.php template, actually all the scripts code that will inserted must be put on the head of the template index.php.
<script src=http://agratitudesign-template.googlecode.com/svn/branches/lightbox/jquery.min.js></script>
To make it safer, so that the link jquery.min.js can be working on your joomla, put the above script link at the beginning of the head. Make sure also that there is only one link javascript library master (jquery.min.js) that you use, to avoid the possibility of the problem that could be the cause of the lightbox evolution doesnt work. For more details lets see the picture below!

<script src=http://agratitudesign-template.googlecode.com/svn/branches/lightbox/jquery.lightbox.min.js></script> <link href=https://agratitudesign-template.googlecode.com/svn/branches/lightbox/themes/brown-gold/jquery.lightbox.css rel=stylesheet type=text/css> <!--[if lte IE 7]><link rel="stylesheet" href="https://agratitudesign-template.googlecode.com/svn/branches/lightbox/themes/brown-gold/jquery.lightbox.ie6.css" media="screen" /><![endif]--> <script src="http://agratitudesign-template.googlecode.com/svn/branches/lightbox/jquery.lightbox.js"></script>

4. Initialize the lightbox to your joomla template and automatically add the class=lightbox to all images of the content joomla, following the script that you need to put next:
<script type="text/javascript"> jQuery(document).ready(function(){ jQuery(.lightbox).lightbox(); }); </script> <script type="text/javascript"> jQuery(document).ready(function($){ $(.lightbox).lightbox(); $(a[href$=jpg], a[href$=JPG], a[href$=jpeg], a[href$=JPEG], a[href$=png], a[href$=gif], a[href$=bmp]:has(img)).addClass("lightbox"); }); </script> The placement of the scripts above in its implementation to the index.php template as shown like the picture below!

Once you save all the changes or additions of the scripts on the index.php your joomla template. Then if youve done it as right, it would be the all of images content of your joomla website will use lightbox wvolution effect that make your joomla website more impressive to show every image in full view. If there are less obvious, lets see the aricle video above!
Available link for download
Thursday, January 26, 2017
Joomla
Joomla

Joomla! is a free, open source content management system for publishing content on the world wide web and intranets. The system includes features such as page caching to improve performance, RSS feeds, printable versions of pages, news flashes, blogs, polls, website searching, and language internationalization. Joomla is licensed under the GPL, and is the result of a fork of Mambo.
The name Joomla is properly written with an exclamation mark as that is part of the name, but this is commonly omitted.
It is written in the PHP programming language and uses the MySQL database by default.
History
Joomla came into being as the result of a fork of Mambo by the development team on August 17, 2005. At that time, the Mambo name was trademarked by Miro International Pty Ltd, who formed a non-profit foundation with the stated purpose to fund the project and protect it from lawsuits. The development team claimed that many of the provisions of the foundation structure went against previous agreements made by the elected Mambo Steering Committee, lacked the necessary consultation with key stake holders, and included provisions that violated core open source values.
The development team created a web site called OpenSourceMatters to distribute information to users, developers, web designers, and the community in general. The project team leader Andrew Eddie, aka “MasterChief” wrote an open letter to the community which appeared on the announcements section of the public forum at mamboserver.com.
A thousand people had joined the opensourcematters.org web site within a day, most posting words of encouragement and support. The web site received the slashdot effect as a result. Miro CEO Peter Lamont gave a public response to the development team in an article entitled “The Mambo Open Source Controversy – 20 Questions With Miro”.
This event stirred deeply held feelings in the free software community regarding what shall constitute “open source”. Forums at many other open source projects were active with postings for and against the actions of both sides.
In the two weeks following Eddie’s announcement teams were re-organized and the community continued to grow. Eben Moglen and the Software Freedom Law Center (SFLC) assisted the Joomla! core team beginning in August 2005, as indicated by Moglen’s blog entry from that date and a related OSM announcement. The SFLC continue to provide legal guidance to Joomla! project.
On August 18, 2005, Andrew Eddie called for community input on suggested names for the project. The development team indicated that it would make the final decision for the project name based on community input. The name the development team chose was not in the list of suggested names provided by the community as it was chosen with consultation from a professional brand consultancy under the pay of Open Source Matters.
On September 1, 2005 the new name, “Joomla”, which is the English spelling of the Swahili (Arabic:???? ,and Urdu: ???? ) word jumla meaning “all together” or “as a whole” was announced.
On September 7, 2005, the development team called for logo submissions from the community, invited the community to vote on the logo preferred, and announced the community’s decision on September 22, 2005. Following the logo selection, Brand Guidelines, a Brand Manual, and set of Logo Resources were published on October 2, 2005 for the community’s use.
The first release of Joomla (Joomla 1.0.0) was announced on September 16, 2005. This was a re-branded release of Mambo 4.5.2.3 combined with other bug and moderate-level security fixes. Joomla version 1.5 was released on January 22, 2008. Joomla won the Packt Publishing Open Source Content Management System Award in 2006 and 2007.
Features
The Joomla package consists of many different parts, which are built to be as modular as possible, allowing extensions and integrations to be made easily. An example of such are extensions called “Plugins”. (Previously known as “Mambots”.) Plugins are background extensions that extend Joomla with new functionality. The WikiBot, for example, allows the author of Joomla content to use “Wikitags” in Joomla articles which will auto-create dynamic hyperlinks to Wikipedia articles when displayed. There are over 2,900 extensions for Joomla available via the Extensions Directory.
In addition to Plugins, more comprehensive extensions are available. “Components” allow webmasters to perform such tasks as build a community by expanding user features, backup a website, translate content and create URLs that are more friendly to search engines. “Modules” perform such tasks as displaying a calendar or allowing custom code like Google AdSense etc to be inserted within the base Joomla code.
Since it has been around longer, there are more extensions available for Joomla 1.0 than for Joomla 1.5, although native 1.5 extensions are becoming increasingly available. Some of the older 1.0 extensions can be used with version 1.5 if it is set to legacy mode.
Joomla permits administrators to set global configuration parameters that affect all articles. Every page conforms to these parameters by default, but a page can have its own setting for each parameter. For example, you can elect to show the article author, hide the author, or simply go with the global “show author” parameter.
Community
Joomla has an official and many unofficial communities. As of February 2008, the official Joomla forum has more than 260,000 threads and over 1.2 million posts from more than 170,000 registered members in 40 languages. Unofficial sites are published in many languages, often with Joomla extensions that are region specific. Bi-directional text support for the Hebrew and Arabic languages, for example, can be found on 3rd party community portals. Unofficial web developers also build extensions and web templates for commercial sale and offer freelance customization services. Usually a template is distributed as a zip file which can be installed using the Joomla installer.
Available link for download
Subscribe to:
Posts (Atom)